Swifty Receiver
The Swifty Receiver is a lightweight Java Micronaut-based API that SwiftyRx uses to communicate with external systems. It is deployed as a Docker container and is responsible for receiving messages from SwiftyRx and forwarding them to the appropriate message queue. The message queue is either Google PubSub or Kafka, depending on the receiving environment’s preference.
Swagger UI for the Swifty Receiver API is available via /api/docs/ of where it is deployed.
Deployment
Docker Hub
The Swifty Receiver API is available on Docker Hub at rxfoundry/swifty_receiver.
Development versions are published with every development build.
Production versions are published with every release.
Docker File
The Dockerfile for the Swifty Receiver API is as follows:
# syntax=docker/dockerfile:1.3
# Build stage
FROM amazoncorretto:21-alpine3.22 AS build

# Install required packages for building
RUN apk update && apk upgrade && rm -rf /var/cache/apk/*
RUN apk add --no-cache curl

# Set working directory for build
WORKDIR /build

# Copy Maven wrapper and configuration files
COPY .mvn/ .mvn/
COPY mvnw pom.xml ./

# Make mvnw executable
RUN chmod +x mvnw

# Download dependencies (this layer will be cached if pom.xml doesn't change)
RUN ./mvnw dependency:go-offline -B

# Copy source code
COPY src/ src/

# Build the application
RUN ./mvnw clean package -DskipTests

# Runtime stage
FROM amazoncorretto:21-alpine3.22 AS runtime

RUN apk update && apk upgrade && rm -rf /var/cache/apk/*

# Copy the built JAR from build stage
COPY --from=build /build/target/swifty_receiver_api-0.1.jar /app/app.jar

# Copy configuration files
COPY --from=build /build/target/classes/application.properties /app/application.properties
COPY --from=build /build/target/classes/logback.xml /app/logback.xml

WORKDIR /app

EXPOSE 8080

# Create non-root user for security
RUN addgroup -S -g 1001 micronaut && \
    adduser -S -u 1001 -G micronaut micronaut

# Change ownership of app directory
RUN chown -R micronaut:micronaut /app

USER micronaut

CMD ["java", "-jar", "/app/app.jar"]
To deploy the Swifty Receiver API in Kubernetes, a Deployment, Service and Ingress are required.
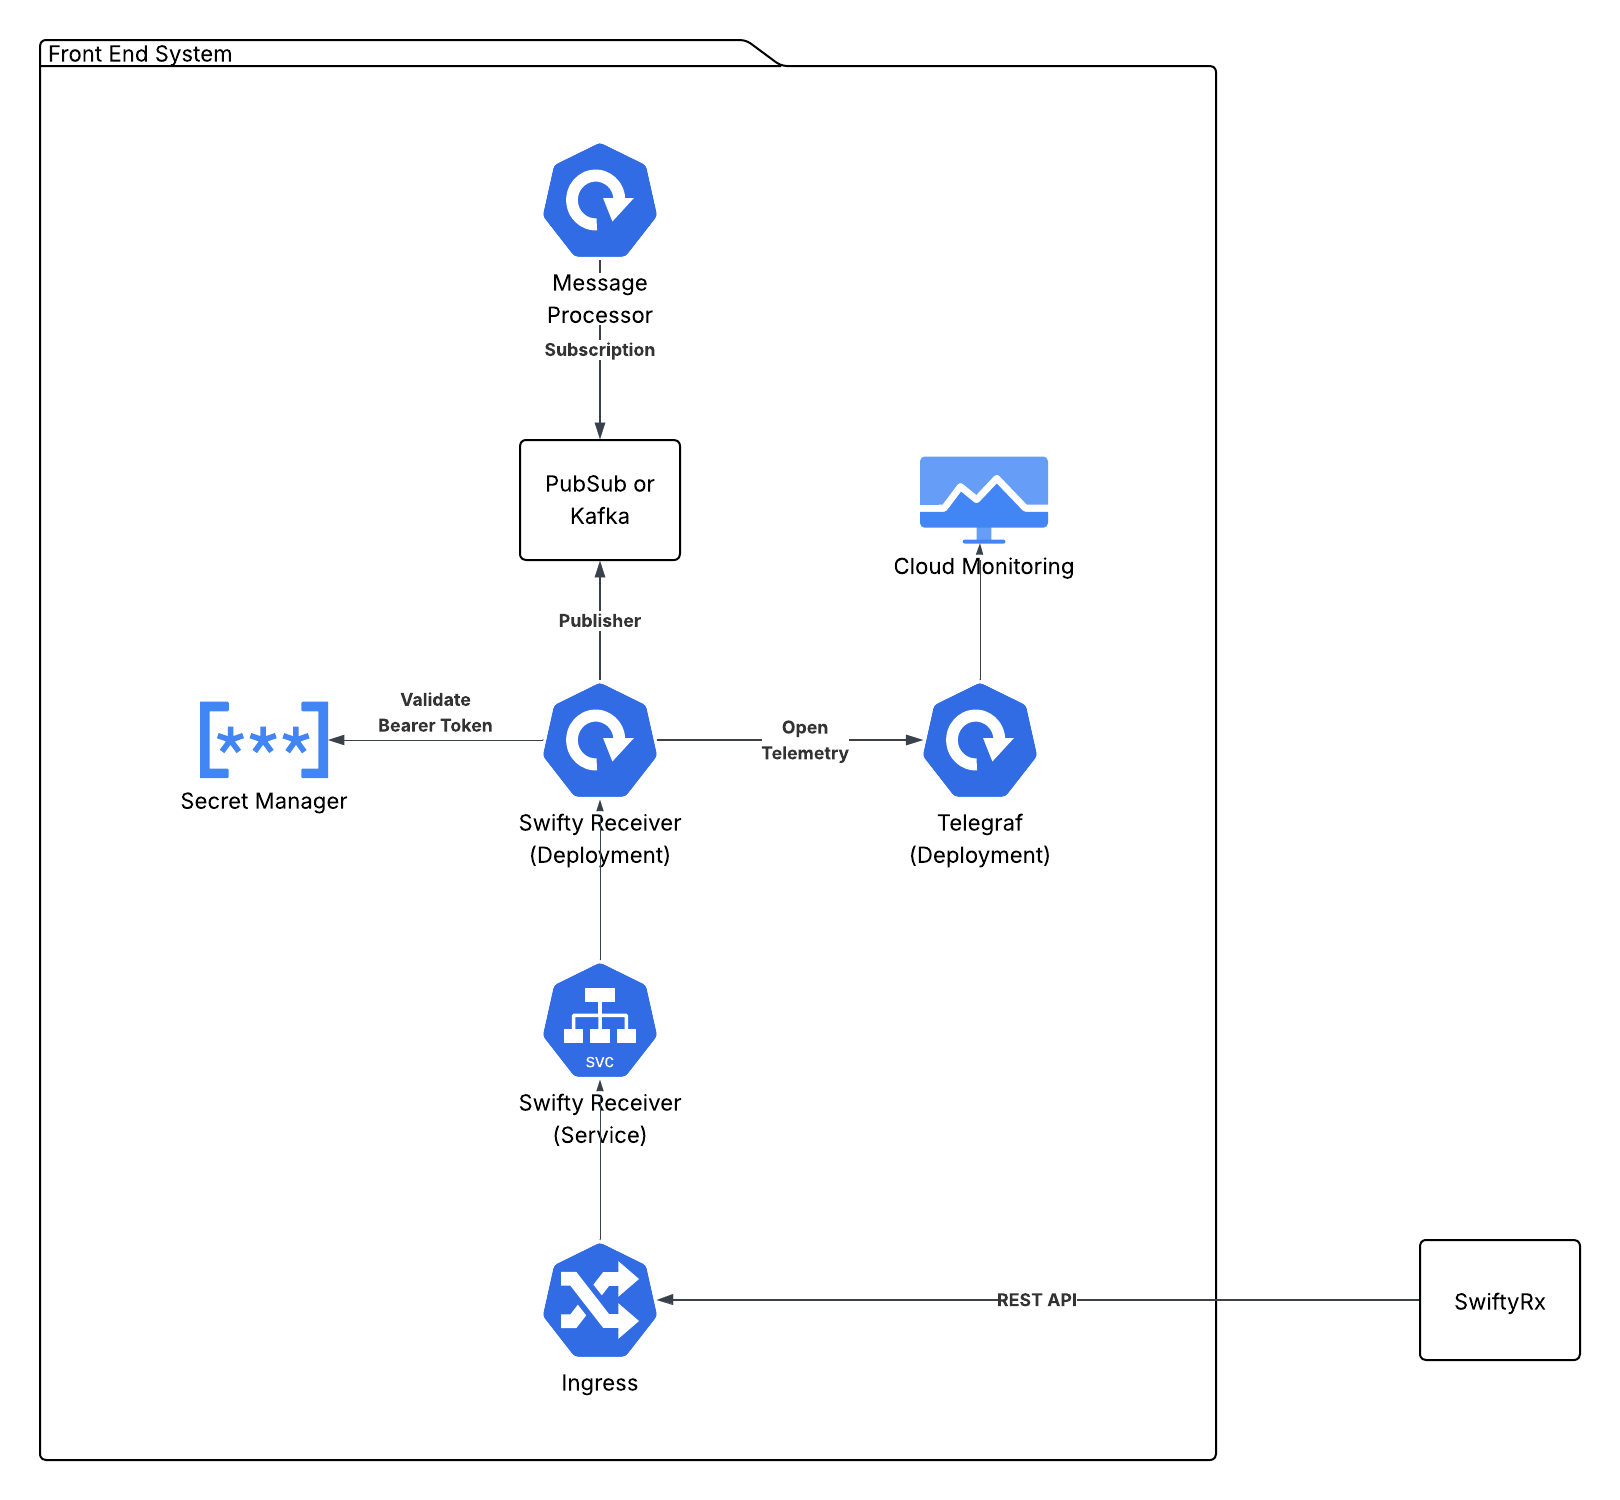
GKE Kubernetes Based Deployment
The following diagram shows the deployment architecture for Swifty Receiver API on GKE.
Deployment
The following manifest is used to deploy the Swifty Receiver API. The items in {{ }} are variables
replaced from a configuration file.
  kubernetes.core.k8s:
    state: present
    definition:
      apiVersion: apps/v1
      kind: Deployment
      metadata:
        name: "swifty-java-receiver-api"
        namespace: "{{ gke_namespace }}"
        labels:
          app: "swifty-java-receiver-api"
          env: "{{ env_ }}"
      spec:
        replicas: 2
        selector:
          matchLabels:
            app: "swifty-java-receiver-api"
            env: "{{ env_ }}"
        template:
          metadata:
            labels:
              app: "swifty-java-receiver-api"
              env: "{{ env_ }}"
          spec:
            topologySpreadConstraints:
              - maxSkew: 1
                topologyKey: "kubernetes.io/hostname"
                whenUnsatisfiable: ScheduleAnyway
                labelSelector:
                  matchLabels:
                    app: "swifty-java-receiver-api"
                    env: "{{ env_ }}"
            affinity:
              nodeAffinity:
                requiredDuringSchedulingIgnoredDuringExecution:
                  nodeSelectorTerms:
                  - matchExpressions:
                    - key: "cloud.google.com/gke-nodepool"
                      operator: In
                      values:
                        - "main-pool"
            containers:
              - name: "swifty-java-receiver-api"
                image: "rxfoundry/swifty_receiver:{{ swifty_version }}"
                imagePullPolicy: Always
                stdin: "{{ stdin }}"
                tty: "{{ tty }}"
                resources:
                  requests:
                    memory: "512Mi"
                    cpu: "100m"
                  limits:
                    memory: "1024Mi"
                ports:
                - containerPort: 8080
                  protocol: TCP
                env:
                  - name: ENVIRONMENT_NAME
                    value: "{{ env_ }}"
                  - name: GOOGLE_PROJECT_NAME
                    value: "{{ project }}"
                  - name: APP_MESSAGING
                    value: "pubsub"
                  - name: PUBSUB_TOPIC
                    value: "swifty-message-receiver"
                  - name: LOGLEVEL
                    value: "DEBUG"
                livenessProbe:
                  httpGet:
                    port: 8080
                    path: /api/receiver/1/version
                  initialDelaySeconds: 90
                  timeoutSeconds: 10
                readinessProbe:
                  httpGet:
                    port: 8080
                    path: /api/receiver/1/version
                  initialDelaySeconds: 30
                  timeoutSeconds: 10
                command:
                  - "java"
                  - "-jar"
                  - "/app/app.jar"
Google Pub Sub Configuration
The following environment variables are required for using Google PubSub in the Swifty Deployment:
    - name: ENVIRONMENT_NAME
      value: "{{ env_ }}"
    - name: GOOGLE_PROJECT_NAME
      value: "{{ project }}"
    - name: APP_MESSAGING
      value: "pubsub"
    - name: PUBSUB_TOPIC
      value: "{{ receiver_pubsub_topic }}"
    - name: LOGLEVEL
      value: "{{ DEBUG | INFO }}"
Kafka Configuration
The following environment variables are required for using Kafka:
    - name: ENVIRONMENT_NAME
      value: "{{ env_ }}"
    - name: GOOGLE_PROJECT_NAME
      value: "{{ project }}"
    - name: APP_MESSAGING
      value: "kafka"
    - name: KAFKA_TOPIC
      value: "{{ receiver_kafka_topic }}"
    - name: LOGLEVEL
      value: "{{ DEBUG | INFO }}"
OpenTelemetry Configuration
The following environment variables are required for using OpenTelemetry:
    - name: OTEL_SERVICE_NAME
      value: "{{ swifty_receiver_api }}"
    - name: OTEL_TRACES_EXPORTER
      value: "{{ otlp }}"
    - name: OTEL_EXPORTER_OTLP_ENDPOINT
      value: "http://localhost:4317"
GKE Managed Kafka
For running against a GKE managed Kafka server, a secret named kafka is required with the following:
{
  "bootstrap.servers": "<your-bootstrap-servers-url>",
  "sasl.mechanism": "OAUTHBEARER",
  "security.protocol": "SASL_SSL"
}
The secret will be named <env_>-kafka, where <env_> is the environment name.
Local RedPanda Kafka
For running against a local RedPanda cluster, a secret named kafka is required with the following:
{
  "bootstrap.servers": "localhost:19092",
  "username": "<username>",
  "password": "<password>",
  "security.protocol": "SASL_PLAINTEXT",
  "sasl.mechanism": "SCRAM-SHA-256"
}
The secret will be named <env_>-kafka, where <env_> is the environment name.
In either case, if you are trying to run locally (i.e. outside of GKE), you need to add the following environment variables.
    - name: GOOGLE_APPLICATION_CREDENTIALS
      value: /path/to/credentials.json
Service
  kubernetes.core.k8s:
    state: present
    definition:
      apiVersion: v1
      kind: Service
      metadata:
        name: "swifty-java-receiver-api"
        namespace: "{{ gke_namespace }}"
        annotations:
          cloud.google.com/neg: '{"ingress": true}'
          cloud.google.com/healthcheck-path: "/api/receiver/1/version"
      spec:
        type: NodePort
        ports:
        - port: 80
          targetPort: 8080
          protocol: TCP
        selector:
          app: "swifty-java-receiver-api"
Ingress
  kubernetes.core.k8s:
    state: present
    definition:
      apiVersion: networking.k8s.io/v1
      kind: Ingress
      metadata:
        name: "swifty-receiver-ingress"
        namespace: "{{ gke_namespace }}"
        annotations:
          kubernetes.io/ingress.regional-static-ip-name: "{{ gke_namespace }}-swifty-receiver-ip"
          networking.gke.io/managed-certificates: "{{ gke_namespace }}-swifty-receiver"
          kubernetes.io/ingress.class: "gce"
          kubernetes.io/ingress.allow-http: "false"
          networking.gke.io/v1beta1.FrontendConfig: "ingress-security-config-swifty-receiver"
      spec:
        rules:
          - host: "{{ swifty_receiver_domain_name }}"
            http:
              paths:
              - path: /api/receiver/*
                pathType: ImplementationSpecific
                backend:
                  service:
                    name: swifty-java-receiver-api
                    port:
                      number: 80
Local OpenTelemetry UI
To see OpenTelemetry metrics locally, it needs to start jaeger app:
docker run -d --name jaeger \
-e COLLECTOR_ZIPKIN_HTTP_PORT=9411 \
-p 5775:5775/udp \
-p 6831:6831/udp \
-p 6832:6832/udp \
-p 5778:5778 \
-p 16686:16686 \
-p 14268:14268 \
-p 4317:4317 \
-p 9411:9411 \
jaegertracing/all-in-one
UI is available via http://localhost:16686/
Additional Notes
The API requires simple Basic Auth.
The receiver can be configured for tenantized versus non-tenantized operation. By default, the receiver
will be configured for non-tenantized operation. To override, set the environment variable APP_IS_TENANT_AWARE=true.
If non-tenantized configuration is used, then the secret key used to store the username and password is {env-name}-receiver_auth_inbound.
If tenantized configuration is used, then the secret key used to store the username and password is {env-name}-{slug}_receiver_auth_inbound.
env-name is passed in as an environment variable ENVIRONMENT_NAME to differentiate between environments (e.g. dev, qa, local, etc).
For example, if the environment name is dev and we are running in a non-tenantized mode, the secret key used to store the username and password is dev-receiver_auth_inbound.
If the environment name is dev and we are running in a tenantized mode, and the incoming url is https://mccpd.example.com/api/receiver/1/async/message, the secret key used to store the username and password is dev-mccpd_receiver_auth_inbound.
The payload of the secret is a JSON object with the following properties:
{
  "username": "foo",
  "password": "bar"
}
The username and password are used to authenticate the incoming request using HTTP Basic Auth. This means the passed in value is the base64.encode(username:password)
Upon successful deployment, you should be able to post data to the endpoint and verify it gets written to the message queue.
For example:
curl --location 'https://mccpd.swiftyrx.dev/api/receiver/1/async/message' \
--header 'Content-Type: application/json' \
--header 'Authorization: Basic Zm9vOmJhcg==' \
--data '{
  "sender": "foo",
  "message_type": "RX_AVAILABLE",
  "message_object_id": "1234",
  "virtual_pharmacy": "mccpd"
}'
Should produce a response like:
{
    "status": "success",
    "message_id": "1234"
}
And you should then see the message in the message queue, as such:
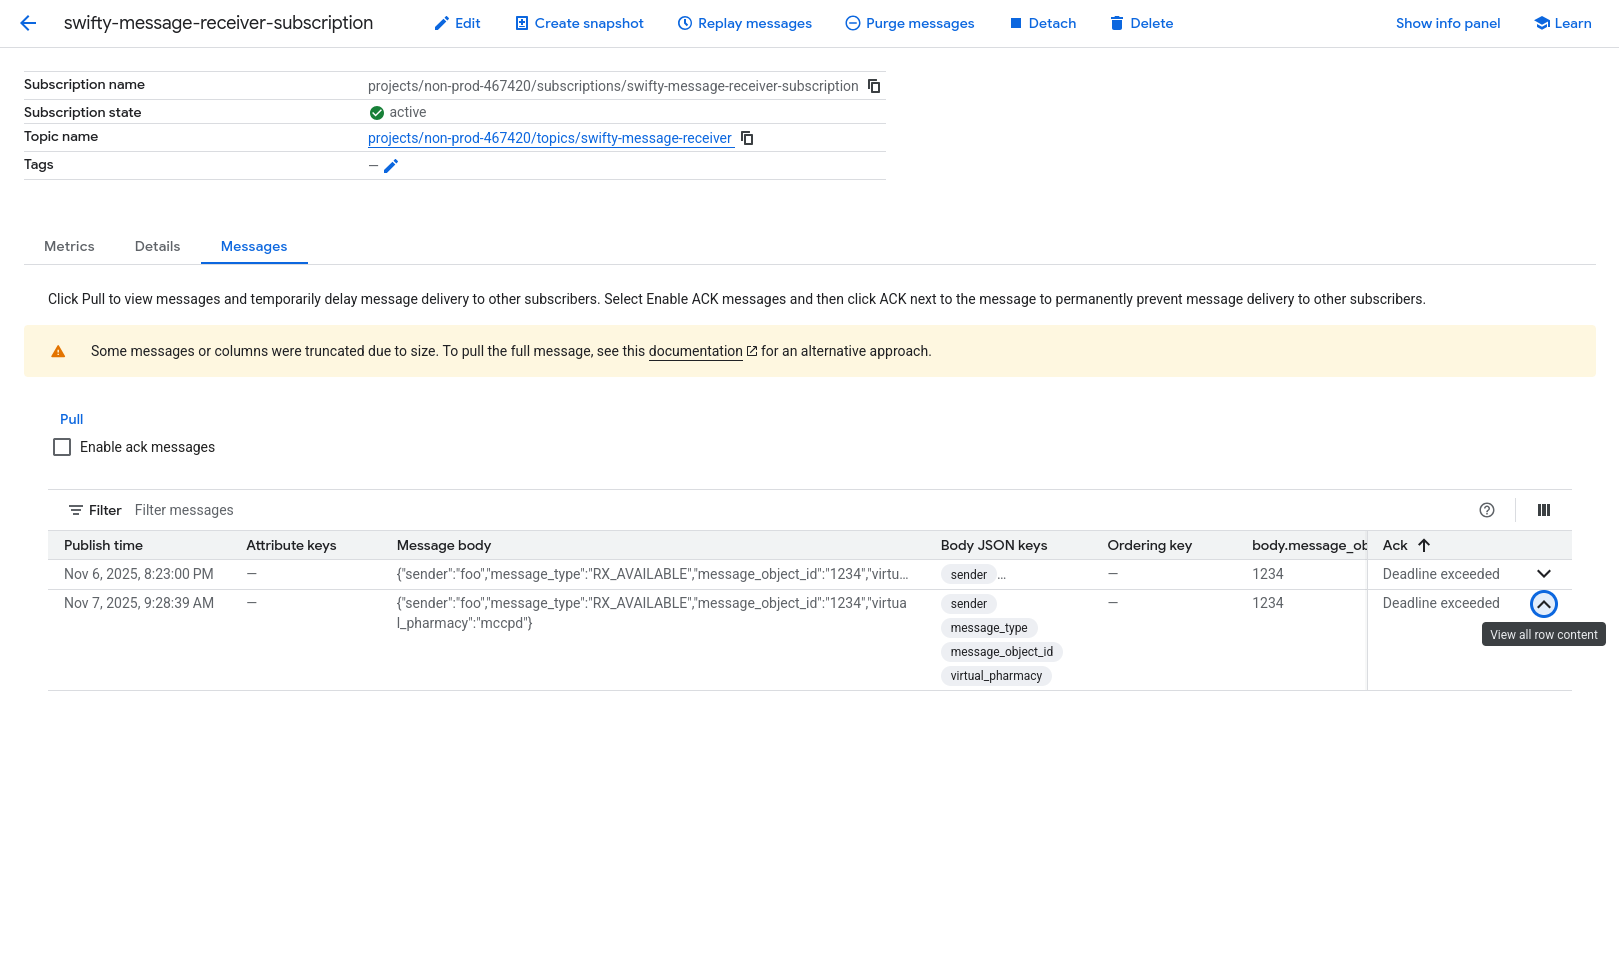
Examples
There is currently an example Python project for processing messages from the Swifty Receiver at https://github.com/rxfoundry/python-receiver-examples. It currently shows processing several prescription messages from Google PubSub. Kafka examples will be added soon.